Linux Conferencing Audio Setup
Working from home and participating in online calls frequently made me aware of the importance of a decent audio setup rather quick. Noise interference, projected from proximity onto my ears, varied from being a nuisance over tiring to painful. So I set out to improve quality of life in this area for all participants if possible.
Hardware
I did not want to spend a lot of money here. Aiming more towards the budget solution, my final list of equipment is shown in the following table. So far I have been happy with my selection overall.
Hardware Acquisition Overview
| Type | Item | Cost |
|---|---|---|
| Microphone | Behringer XM8500 | 18 € |
| Audio Interface | Behringer UMC202HD | 54 € |
| Microphone Stand | Millenium MA-2040 | 20 € |
| Cable | the sssnake SM6BK | 5 € |
| Windshield | t.bone WS60 | 3 € |
| 100 € |
Microphone
I would like to highlight that I deliberately chose a dynamic microphone with cardioid polar pattern for ambient noise suppression. I do not work in a particular loud environment, but the room is untreated and definitively produces echoes, which I would not want to have my audience suffer from. This also allows me to use loudspeakers instead of headphones without producing feedback loops for the other participants in a call.
I do not think that buying a more expensive microphone would necessarily result at higher audio quality in the conferencing scenario (see also the conclusion section for this).
Audio Interface
I assume I would be equally happy with the smaller version of the selected audio interface (Behringer UMC22). At the time of purchase, the price difference was negligible, so I went for the upgrade. The only thing I miss here is a VU meter. It would be a nice to be able to monitor the recording volume directly on the hardware. On the other hand, I never changed the knob after setting it up.
These audio interfaces do not come with a power switch and thus will be constantly powered while plugged in. If this is a concern to you, I also recommend a USB-Hub with some kind of toggle switch for each port.
Miscellaneous
For the boom arm, I was concerned if a cheapish solution would do the job, and again, I find it more than suitable. I also do not miss a shock mount and think that this money is better spent elsewhere. Those might even be counterproductive, as they obstruct your camera’s view more.
If it is a concern to you how you will look in calls with a rather noticeable microphone in front of you: Thanks to the flexible arm, I have no trouble arranging it in a discreet way. It is also possible to boom this microphone and hide it from the view entirely, depending on the field of view of your camera.
One additional thing I will maybe get in the future for ease of mind is an inline microphone amplifier, but it is absolutely not a must with this hardware combination.
The selected microphone is supposedly sensitive to plosives, so I opted for a foam windshield to be on the safe side here. The foam is only put halfway over the grill, so that there is space between the foam and the membrane. With this setup I have no issues with pop sounds. Tech Raccoon illustrates this better than me.
At this point I want to highlight that I do not have experience with dedicated recording equipment and your findings might be different. While browsing for equipment, I found the reviews of Podcaststage and Julian Krause helpful.
Software
The main idea is to use Jack audio plugins for processing the live audio signal in order to improve quality. This processed signal shall then be used as input for any conferencing software. This processing should ideally be transparent to any consumer software and to me. To unite the realm of professional audio processing and consumer audio software, PipeWire became my tool of choice. I received the assurance that this is at all possible through unfa, who also was first to convey an impression how it might look like when applied to me.
Signal Routing
For this to work, we will define a virtual microphone first. This device can then be selected as audio source in applications similar to any physical microphone. The PipeWire media session manager will persist the configuration, even across reboots.
~/.config/pipewire/media-session.d/media-session.conf
…
context.modules = [
    …
    { name = libpipewire-module-loopback
        args = {
            capture.props = {
                node.name = "MyCarlaSource"
                node.description = "MyCarlaSource"
                node.target = Carla
                stream.dont-remix = true
                node.passive = true
                audio.position = [ FL FR ]
            }
            playback.props = {
                media.class = Audio/Source
                node.name = "MyCarlaSource"
                node.description = "MyCarlaSource"
                stream.dont-remix = true
                node.passive = true
                audio.position = [ FL FR ]
            }
        }
    }
    …
]
…
The original microphone signal needs to be routed through an audio processor first and only then to consuming applications. This processor will be Carla (see the audio processing section). The following is the script I use to set up the required connections.
/usr/local/bin/audio-wiring.sh
#!/bin/sh

if [ $# -eq 0 ]
then
    echo "Missing options!"
    exit 0
fi

SETUP="$1"

if [ $SETUP = "on" ]
then
    sleep 10

    pw-link --disconnect alsa_input.pci-0000_06_00.6.analog-stereo:capture_FL MyCarlaSource:input_FL
    pw-link --disconnect alsa_input.pci-0000_06_00.6.analog-stereo:capture_FR MyCarlaSource:input_FR

    pw-link --passive alsa_input.usb-BEHRINGER_UMC202HD_192k-00.pro-input-0:capture_AUX0 Carla:audio-in1
    pw-link --passive alsa_input.usb-BEHRINGER_UMC202HD_192k-00.pro-input-0:capture_AUX1 Carla:audio-in2

    pw-link --passive Carla:audio-out1 MyCarlaSource:input_FL
    pw-link --passive Carla:audio-out2 MyCarlaSource:input_FR
fi

if [ $SETUP = "off" ]
then
	echo NOOP
fi
The image below shows the resulting routes as visualized by Helvum.
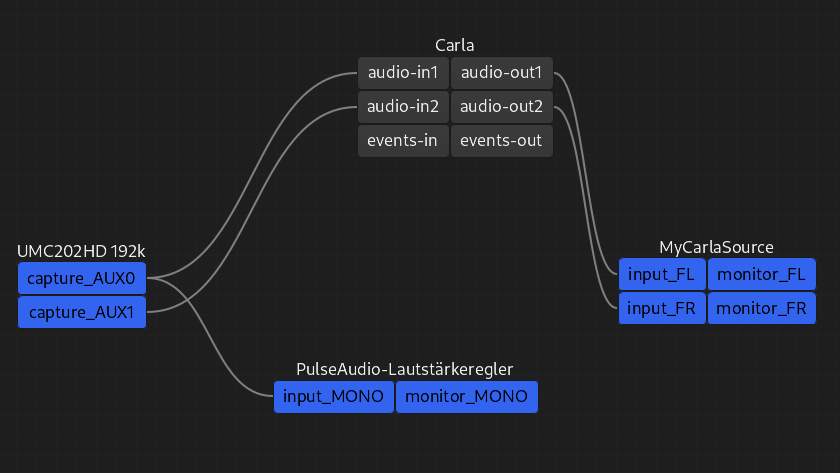
Helvum readout with hardware connected and routing established
Automated Wiring
At this point, only our virtual microphone will survive unplugging our hardware and restoring the wiring manually each time is tiresome. Therefore, I also sought a low effort solution to reliably restore this routing.
I at first tried WirePlumber as alternative session manager to achieve this, by reacting on events with it. However, I felt this becoming more complicated than it should be, and it would introduce an (at the time of writing) experimental software element. Hence, I decided to abandon this approach and go with a simple udev rule, that reacts when the hardware is plugged in.
/etc/udev/rules.d/99-behringer.rules
ACTION=="add", SUBSYSTEM=="sound", ATTRS{idVendor}=="1397", ATTRS{idProduct}=="0507", TAG+="systemd", SYMLINK+="audio_interface", ENV{SYSTEMD_USER_WANTS}+="audio-wiring.service"The shown rule triggers the systemd user service below, when the audio interface becomes available to the system. This in turn invokes our already known wiring routine.
audio-wiring.service
[Unit]
Description=Trigger Microphone Routing Reconfiguration
After=pipewire-pulse.service

[Service]
Type=oneshot
ExecStart=/usr/local/bin/audio-wiring on
ExecStop=/usr/local/bin/audio-wiring off
RemainAfterExit=no

[Install]
WantedBy=sys-devices-pci0000:00-0000:00:08.1-0000:06:00.4-usb4-4\x2d2-4\x2d2:1.0-sound-card4-controlC4.device
It is accompanied by another user service that provides the audio processor.
carla.service
[Unit]
Description=Load Carla Rack JACK host

[Service]
Environment="PIPEWIRE_LINK_PASSIVE=true"
Type=exec
ExecStart=/usr/bin/pw-jack carla-rack -n ~/.config/MyCarla.carxp
ExecStop=/usr/bin/killall carla-rack

[Install]
WantedBy=default.target
While it surely looks daunting, I never had to revisit these files once set up.
Audio Processing
Having the signal routing in place, we can finally head on to improving our audio recording quality. To apply the required processing to the hardware microphone output, I utilize Carla. This software is able to apply a sequence of audio plugins and thus to transform the signal to our benefit.
There are numerous plugins to choose from. Without having a profound background on the topic, I ended up choosing those from the Linux Studio Plugins Project. These struck me as the best option regarding availability, feature richness and, not at least, accessibility due to graphical interfaces and effect visualizations.
The following image gives an overview of the final configured rack of plugins. I will briefly explain the purpose of each throughout the next paragraphs.

Carla Audio Plugin Rack Overview
Parametric Equalizer
The first plugin, which our audio signal needs to pass, is the parametric equalizer. Aside from looking fancy, these type of equalizer are more flexible in configuration than their counterpart, the graphic equalizers. I found this terminology misleading and ended up trying the latter first. As you can see in the displayed settings, there is plenty of graphic in the parameterized equalizer to work with. It also handles a few processing tasks in my setup at once.

LSP Parametric Equalizer Settings
- Volume
- I increase the input signal strength by 20dB via software. The idea was to leave some wiggle room, by not maxing out the gain of the audio interface, in case I needed to adjust the volume quickly while being on call. Practically this never happened and you might want to forego this setting.
- Background Noise
- The first filter (numbered with 0 in the screenshot) is set to remove noise ranging below the human voice, like the humming of a fan or the low frequency sound any other device may produce.
- Richness
- Raising the lower to mid-range frequencies with the second filter (#1) helps to present the body of the voice more. This should allow for a bit of radio moderator feeling in your recording. I find an increase of 2 dB to be moderate, though it did not alter my voice a lot in my opinion. It is still authentic.
- De-essing
- The remaining active filters (#3 and #4) are meant to reduce harshness in my voice recording. The screenshot above was taken while I was provoking sibilants and recording. At the sensitive frequency ranges, I put targeted cuts in volume to smooth out the overall result. These frequencies are individual, so I advise to investigate the proper frequencies and gain reduction for your environment.
This approach to configure the parametric equalizer plugin is in general mimicking the one from In The Mix, where it is explained in greater detail as well.
Compressor
The next filter plugin in line is a downward compressor. It is set to reduce dynamic range from the recording when the volume of the signal crosses a certain dB threshold. This means it makes loud sounds less loud and thus produces a more uniform listening experience for the audience.

LSP Compressor Settings
Expander
The next plugin is a downward expander that treats the lower end of the volume scale. This one increases the dynamic range for signals below a dB threshold. Meaning it makes quiet sounds more quiet. I like this approach over a simple noise gate, which would abruptly cut off quiet parts and in doing so has the higher potential to produce a choppy sound experience. For example, at the beginning of a spoken word.
Another reason to like it, is that the plugin virtually increases the distance between the microphone and unwanted noise sources. Keystrokes, e.g., are hereby either suppressed in or entirely excluded from the recording.

LSP Expander Settings
Limiter
The last plugin in my chain of audio processing is a limiter. Its purpose is to catch sounds that escaped the compressor, i.e., that were too loud to be effectively reduced to a sufficient level. It is more of a failsafe to prevent any distortion from unforeseen signals.
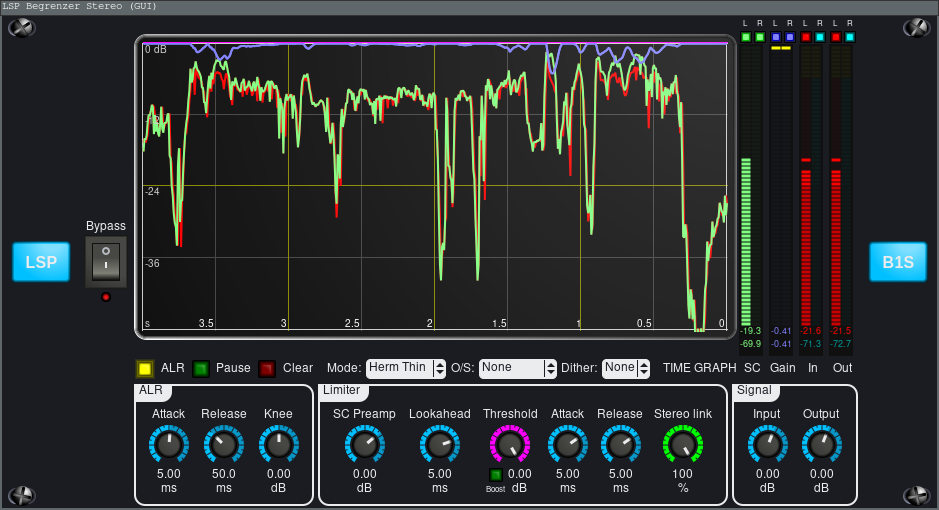
LSP Limiter Settings
Summary
I particularly like that this set of plugins makes due without requiring a ton of computation resources. Given a microphone that captures relatively near field sounds only, reduces the amount of required processing significantly. I did not have had the need to add more complicated plugins, like noise reduction via neural networks or similarly intensive filters. If you happen to record in a noisier environment, adding additional plugins is an option of course.
Future Work
This solution as described in the software section is surely not as good as it could be. As soon as I reached the “works for me” state, I did not feel the urge to improve it further. At least for now.
I find the number of scripts (udev / systemd) required for the automated configuration a bit too cumbersome and would like to reduce them, as this would ease the first time installations. Furthermore, I did not bother to investigate which parts of the scripts are actually required and some parts might as well just be artifacts from my experiments. Those configurations could be cleaned up a little in the process of minimization as well. WirePlumber might provide a solution for this at some point in the future.
To my knowledge, PipeWire allows for audio filtering by itself. Configuring the audio processing here directly could replace Carla and thus reduce complexity. The process of figuring out the individual exact settings, still benefits from the graphical interface Carla provides in my opinion. I find this especially true for persons without profound audio processing experience, like myself.
Conclusion
I am able to get ready for a call by only connecting (or powering) the physical audio interface within a few seconds, without having to worry something might suddenly not work in respect to my setup.
PipeWire is robust to use as daily driver when it comes to audio processing.
I would be glad if I could bridge the gap between open source enthusiasts and sound engineers even a little. Starting from scratch, It took me roughly a week to set this up and to figure out suitable processing parameters. I hope to have contributed to you beating this time if you want to try something similar for yourself.
The general feedback I have received on the audio quality was: It is good. The way you will be perceived highly depends on the speaker quality at the receiving end, as well as the compression of the conferencing software. So I think it is safe to say: Better do not to expect to amaze your audience when it comes to sound experience.
In respect to audio quality only, my guess is that one can get a long way with a noise suppressing headset microphone, some of which are more affordable than this setup, as long as it uses some kind of dedicated USB-interface, which reduces baseline noise of the electronics.
The main benefit I have gained personally is a cable, hands and headset free environment, that I can get as quickly as easily in or out of my way as it pleases me. Therefore, I consider this experiment to be a success.